
Host Windows games on a Linux server
Don’t you hate running an extra computer with Windows on it just to start up the server application of an old game? Or do you want to host a server for a game but there is no Linux binary available? Then you’ve come to the right place. In this blog post I will show you how to host one of my favorite Windows-only games – Tron 2.0 Killer App – on a Linux server that has no graphical environment or X running, with an extra user in its own environment, so it should not be possible to use its security holes for gaining access to your machine. I also added a failsafe script that kicks in and restarts the server if it crashes.
You will have to install Tron, the unofficial patch 1.042 and KillerApp on your Windows machine in order to copy some files from there later on. Lets start:
First, we login to our machine via ssh (as root user) and create a new user called gameserver. This one will be used for running our TRON server:
useradd --home-dir /home/gameserver --password swordfish
--shell /bin/false gameserver
Now we have a new user without a shell. No one can login to our box with this user. Its home directory is /home/gameserver. Fine. Lets move on, the next step is installing the needed software for running the TRON server:
apt-get install wine xvfb
Wine is needed to emulate a windows environment, xvfb is creating a virtual screen later on, so we can run the server without a screen attached.
Now create a new directory /home/gameserver/tron with
mkdir /home/gameserver/tron
and place the following files into it:
Directories and all subfiles in them:
Custom
LightCycleGameData
Profiles
ServerData
tcdg
Files:
Engine.rez
Game.rez
Game2.rez
mfc42.dll
mpger.ls0 (If you have it)
SndDrv.dll
Sound.rez
TRONSrv.exe
autoexec.cfg
bl.dat
gamep5.rez
gamep6.rez
launchcmds.txt
layout.bin
ltmsg.dll
msvcirt.dll
server.dll
Note that there has to be a config inside the ServerData folder. And JUST ONE CONFIG. So you should start up the program at least one time on your windows box and do all the required settings in the multiplayer wizard. After that, you have a preconfigured configfile that you can copy to your linux box.
Second note: Get a msvcirt.dll somewhere on the internet or copy it over from your Windows box into the tron-folder. Wine needs this file to start up the server.
This is it – the TRON server files are on your box and your user is created. But in order to start up properly it still needs some registry entries in your fake windows environment. Otherwise the TRONSrv.exe fails with a “Could not load resource file” error.
To create your fake wine folder, type
sudo -s -u gameserver
xvfb-run -a winecfg
into your terminal. The program will create a /home/gameserver/.wine folder for our settings. In that folder, our registry settings are stored.
Press CTRL+C to quit the program (you can’t use it without a display) and type
exit
to return to your previous user.
Now type the following into your terminal
mcedit /home/gameserver/.wine/system.reg
An editor should open up. If not, install the program mc with apt-get install mc.
Directly after the line
[SoftwareMicrosoftWindows NTCurrentVersionSvcHost] 1338803243
"netsvcs"=str(7):"BITS"
add the following code
[SoftwareMonolith ProductionsNo One Lives Forever1.0] 1339584011
[SoftwareMonolith ProductionsTRON 2.01.0] 1339521803
"CDKey"="YOUR-CDKE-YGOE-SHER-E000"
"Commands"="-windowtitle "TRON 2.0: Killer App Mod""
"InstallDir"="Z:tron"
"KAModFOV"="106"
"KAModResolution"="1360x768"
"KAModTemp"="Z:tronCustomModsRetailKAModTempWORLDSRETAILSINGLEPLAYER"
"Language"="German"
"Last Random"=dword:00000000
"Num Launcher Runs"=dword:00000004
"OptionsWarning"=dword:00000001
"ProfileName"="Player"
"Save Commands"=dword:00000001
"SelectedMod"="Retail"
"UpdateCommandLine0"="-rez gamep5.rez"
"UpdateCommandLine1"="-rez gamep6.rez"
"UpdateCommandLine4"="-rez "Z:trontcdggame""
"UpdateNum"=dword:00000005
Don’t forget to enter a correct cdkey. I will not give you mine ![]()
Since you chose to start TRONSrv from the Z: drive you will still have to tell wine which folder to use as the Z: drive. In our case, this is /home/gameserver.
To do so, create a symlink with the following commands:
mkdir /home/gameserver/.wine/dosdevices/z:
ln -s /home/gameserver /home/gameserver/.wine/dosdevices/z:
Now we set up a script that starts your tron server.
Create a new crontab for the gameserver user with the following command:
EDITOR=mcedit crontab -e -u gameserver
Paste the following content into the editor and press F2+F10 to save and close it:
MAILTO=""
* * * * * /home/gameserver/tron_check.sh
What this does: It starts the script tron_check.sh every 60 seconds – so we gonna have to create that and fill it with contents:
mcedit /home/gameserver/tron_check.sh
The editor opens again. This time, paste the following commands into it. Close with F2+F10.
#!/bin/bash
# check daemon
ps -ef | grep -v grep | grep TRONSrv.exe
# if not found - equals to 1, start it
if [ $? -eq 1 ]
then
cd tron && nohup xvfb-run -a wine TRONSrv.exe > /dev/null 2>/dev/null &
else
echo "tron found - do nothing"
fi
Now we will make sure, that the whole directory belongs to the right user and that the script is executable:
chown -R gameserver:gameserver /home/gameserver
chmod +x /home/gameserver/tron_check.sh
Done! Now wait some seconds and your server should show up in the master list! If not, unblock the ports 13139, 28888-29901 (TCP) and 27888-29901 (UDP) in your firewall.
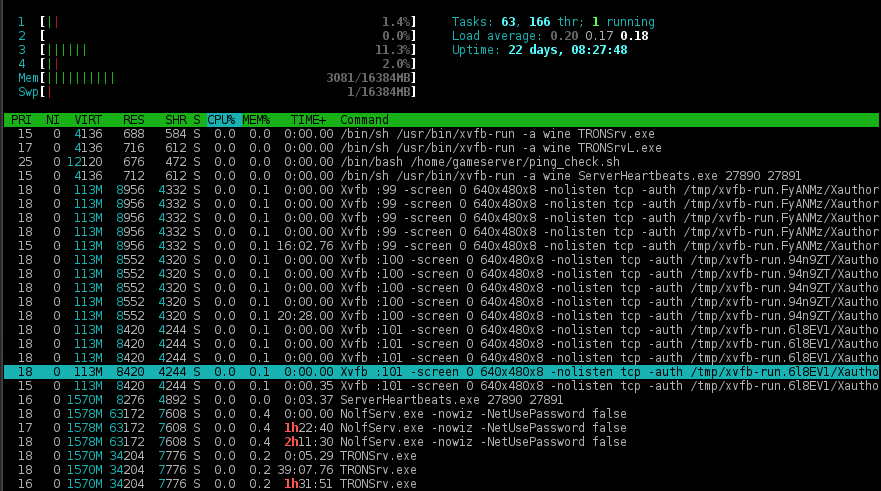
You can check my server status here, it is running very stable via wine:
Running a second server is also possible, but a bit more complicated. I will not cover that here, however I am here if anyone needs assistance.
I know that some of these steps are very specific to the game I am running but it may help some of you out there to get your servers running on Linux.
Note: If you want to access the graphical interface directly, type in
ps -ef | grep -v grep | grep Xvfb
You will see the virtual screen your server is running on. Its a number like :1, :2 or :99. Just remember this number and start up a VNC server with this command:
x11vnc -display :99
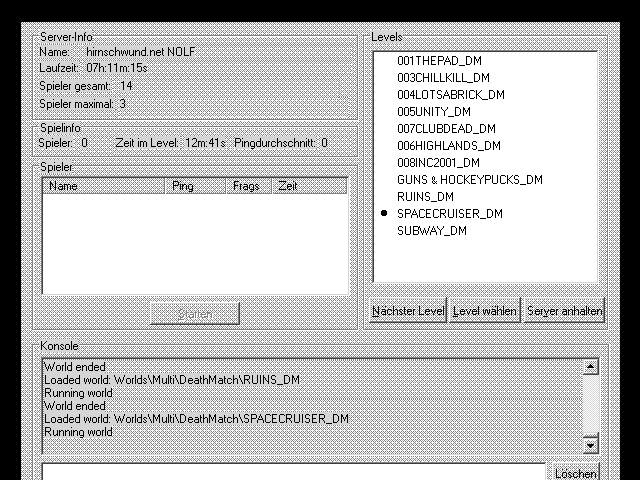
Now you can connect to your server with any VNC viewer on Windows or Linux and administrate your server with your mouse. Doesn’t look pretty, but it works – at least for the game “No One Lives Forever”, where I need this:
If you don’t want anyone be able to connect to your interface, password protect x11vnc. It prints out instructions on how to do that when you start it up.
Genau so etwas suche ich für ein kleines Windows Wetterdaten-Dekodierungsprogramm, welches sich ebenfalls mit CMD Kommandozeilen ausführen lässt. Bei mir will er aber ständig den X-Server haben, trotz des xvfb über Debian.
Ich benötige die GUI aber nicht, weil ich die Decodierung über CMD Parameter anstoßen kann.
Vg, Alexander
Hallo,
dafür liefert wine das Programm “wineconsole” mit – das sollte auch ohne X-Server laufen. Zur Not mit “–backend=curses”.
Hmm, das ist komisch, ich habe blank ein Debian Root-Server in der Cloud aufgesetzt zum Testen. aptitude install wine xvfb ausgeführt sowie zusätzlich halt noch winetricks, was ich aber anscheinend für das simple Windows Dekodierungsprogramm nicht benötige.
Jedenfalls verlangt er auch bei wineconsole xorg X-Server.
wineconsole
Application tried to create a window, but no driver could be loaded.
Make sure that your X server is running and that $DISPLAY is set correctly.
err:systray:initialize_systray Could not create tray window
Application tried to create a window, but no driver could be loaded.
Make sure that your X server is running and that $DISPLAY is set correctly.
Ein weites Problem ist, dass ich das Programm einmal mit GUI wohl starten muss, weil ich habe zwar das *.KEY file im Programmverzeichnis, weil dieses Programm ebenfalls einen Lizenz Key benötigt, habe ich halt unter Windows schnell hinzugefügt, aber das derbe ist natürlich, dass sich bei neuer Hardware der Lizenzschlüssel wieder ändert. Anfordern kann ich jederzeit anhand dieses neuen generierten Schlüssels einen neuen Lizenzcode, nur muss ich den dann direkt in Linux in der GUI eingeben, aber halt nur einmalig.
Was macht das Programm eigentlich: Ich hole praktisch von einem Wetterdienst per FTP einige Wetterdaten ab, dann muss dieses Programm namens FMdecode diese automatisch per CMD Batch ausgeführt dekodieren und zwar 24/7, welches dann lesbare CSV/XML Dateien erzeugt, diese müssen halt in ein Verzeichnis am besten wieder unter Linux Dateisystem liegen, welches ich dann per SFTP mit Leserechten freigebe. Für die meisten Wettermodelle und Dateiformate gibt es oft Linux C/Python/PHP Extensions, nur leider für diese FM Decodierung nicht.
Mit der Linux Lösung spare ich mir eine Menge Umwege wie erst von Wetterdaten per FTP via WinSCP ziehen, dann mit FMdecode unter Windows verarbeiten (extra Maschine) und dann wieder automatisch via WinSCP SFTP auf meinen Linux Server dekodiert puschen.
Die Software ist nur rein 32-Bit, habe auch die Wine 32-Bit Packages installiert.
Kurze Anmerkung: Habe gerade gesehen, dass ich unter Debian Wine 1.4.x mit aptitude installiert bekomme. Ich kann mir allerdings auch Wine 1.6.2 besorgen.
Ich habe es anscheinend erstmal ohne GUI hinbekommen. Wine und Xvfb nochmal in Debian reinstalled und dann xvfb-run wine fmdecode.exe – wird ausgeführt ohne Fehlermeldungen oder Verlangen nach X-Server/GUI.
Jetzt noch einmalig die GUI anzeigen lassen über x11vnc für das Anzeigen der Seriennummer. Dann dürfte ich es bald wunderbar am Laufen haben.
Genau so hätte ich es auch vorgeschlagen. 😉 Würde mich wundern, wenn es nicht liefe. Viel Erfolg!
Habe es geschafft 😉 mit x11vnc und VNC Viewer. Jedenfalls aber öffnet er 0 Hauptdisplay und momentan geht es nur mit dem folgendem SSH Befehl:
Xvfb -screen 0 800x600x16 -ac &
DISPLAY=:0 wine fmdecode.exe &
x11vnc -display :0 &
Soweit so gut, habe noch paar Teile von dir übernommen.
Aber leider funktioniert dieser Befehl nicht bei mir. Also es erstellt keinen Ordner .wine (ich bin als root User eingeloggt)
sudo -s -u fmdecode
xvfb-run -a wine cfg
Hier meine aktuelle Befehlskette:
Xvfb -screen :10 800x600x16 -ac &
export DISPLAY=:10 &
DISPLAY=:10 wine fmdecode.exe &
x11vnc -rfbauth ~/.x11vnc/passwd -display :10 &
Bin gerade dabei ein .sh Script zu erstellen. x11vnc sichere ich mit Kennwort ab.
Der Befehl ist “winecfg” zusammengeschrieben. wine als root laufenzulassen würde ich aus Sicherheitsgründen nicht empfehlen.
Ich weiß nicht, ob wine da von sich aus nicht startet wie manch andere Programme. Es sollte aber eigentlich /root/.wine als Verzeichnis erstellen.
Ja ich weiß ;). Ich habe auch schon einen Benutzer nur für Wine erstellt ohne Shell Zugriff. Das ganze liegt noch auf einem blanken Root-Server in der Cloud zum Testen. Wenn es fertig ist, geht es auf einen produktiven Server.
Das winecfg auseinander geschrieben wurde, liegt wohl an meinem Mac Rechtschreibkorrektur.
winecfg fordert mit xvfb-run ständig :99 Display.
Habe auch das soweit gelöst bekommen und halt noch fehlende Fonts nachinstalliert!