

Linux Mint 20.2: Install and remove a lowlatency kernel
Some time ago I got a MIDI-controllable Roland MC-303 drum machine at a very affordable price. I think this device is one of the most complicated of its kind that you can buy and now I am wondering whether I shouldn’t have used a more modern device to start making music, but well…
The Roland MC-303 can also be used as a small keyboard to play sounds in a DAW via MIDI – in this case I use the application LMMS on Linux Mint and a Midimate EX for connecting MIDI via USB.
However, when playing on the keyboard in LMMS, I always have a slight, but somewhat annoying delay that I wanted to get rid of. The solution seems very simple: All you need is a low-latency kernel for Linux. For security reasons, I advise against using such a kernel for regular use. It’s not a problem if you have an an extra PC that is only used for making music, though. Linux Mint is based on Ubuntu and can therefore also use the low-latency kernels of the Ubuntu Studio project.
The problem: It’s not very well documented how you’re actually supposed to do this. Welcome to the wonderful world of Linux. 🙂
First of all, you need to enable a special hidden flag for the mintupdate software. (in German: “Aktualisierungsverwaltung”). This flag makes it possible to see a selection box for the kernel type. You need to input this command into a terminal:
gsettings set com.linuxmint.updates allow-kernel-type-selection true
In older versions of Linux Mint (at least 17.x) this option was named differently, this command does not work in the latest version 20.2 anymore:
gsettings set com.linuxmint.updates use-lowlatency-kernels "true"
Now you have the possibility to install your own lowlatency kernels in the Mint Updater. You can find these at “View -> Linux kernels”
After rebooting the system the new kernel is being used. You can check this by running the uname command in a terminal:
uname -a
If you see the phrase “lowlatency” in its output everything has been installed correctly.
Unfortunately, I now had a different problem: The built-in sound chip of my PC did not work well with this kernel. The delay when playing notes was gone, but I had ugly cracking noises when playing my sounds. So I wanted to switch back to the regular “generic” kernel.
This was a bigger problem than I expected. You can switch back to the “generic” kernel in the Mint Updater and install one of these kernels, but it’s not set as the default boot option, so you always boot back into the low-latency kernel.
When I tried to uninstall the lowlatency kernel using apt, the unsigned version of the same kernel was installed again. So now I only had the option to switch between the signed and the unsigned lowlatency kernel, not to the preinstalled “generic”. A vicious cycle.
This command did not work at all:
sudo apt remove linux-image-5.13.0-22-lowlatency
The package linux-image-unsigned-5.12.0-22-lowlatency was then installed and set as the current kernel.
However, you can tell apt to ignore this new alternative package – this is done by putting a dash behind the package name, like this:
sudo apt remove linux-image-5.13.0-22-lowlatency linux-image-unsigned-5.12.0-22-lowlatency-
This now ensures that all lowlatency kernels are uninstalled and the previously installed generic kernel automatically becomes the active kernel again. Linux Mint does not seem to know this use case (or it was not programmed in), so a warning window pops up and warns the user that all kernels are being uninstalled and the system will no longer be bootable.
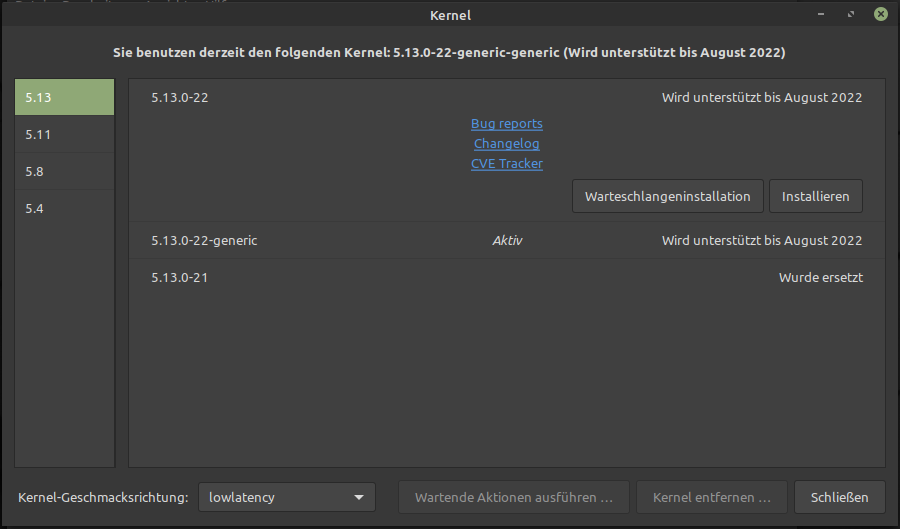
As long as at least one generic kernel is installed, this warning can be safely ignored. After restarting the system, the previously installed generic kernel was active again and was also displayed in the Mint Updater as such:

I guess I’ll have to look for a better sound card now. Whether it will also improve my music skills remains to be seen.
Ty
Thank you Danny for your website & information! Not sure who to tell this to so I’m choosing to tell you. I have several machines running Linux Mint Cinnamon versions 21.x through 22.0 In order to take advantage of the low latency effect on all of them I tried your “allow-kernel-type-selection” setting to TRUE and selected the now visible low latency kernel. It worked & was even reversible to the generic kernel. Then I upgraded to Mint 22.1. Now clicking on the Update Manager menu selection “View – Linux Kernels” will freeze the Update Manager requiring restarting the machines or KILLALL mintUpdate. Resetting “allow-kernel-type-selection” back to FALSE restores the “View-Linux Kernels” functionality, but, of course, removes the ability to switch between the low latency and generic kernels. Upgrading to Mint 22.1 BEFORE setting “allow-kernel-type-selection” to TRUE prevents access to the “View – Linux Kernels” menu selection & selecting the low latency kernel. Upgrading to Mint 22.1 AFTER setting “allow-kernel-type-selection” to TRUE prevents access to the “View – Linux Kernels” menu selection & reselecting the generic kernel. Maybe something you could investigate and/or maybe you know someone in the Mint community to tell?